I recently switched laptops and I often find myself going back to the old one to access certain files and documents. Sometimes I don’t have the laptop with me or am very far away from it so to make things easier I turned it into an SSH server. This details my hour long process I had to do to make things right and set up the server on my ubuntu and also setting up the router.
Table of Contents:
SSH Over LAN
SSH protocol, designed by the finnish computer scientist tatu ylonen is a network protocol for secure connections over an unsecure network. It uses public-private keys authentication to secure a network connection. OpenSSH is a very popular implementation of the SSH protocol that is available in almost all OS. Setting up the ssh server on an ubuntu machine can be very easily done with:
sudo apt update && sudo apt upgrade -y
sudo apt install openssh-server
sudo systemctl start ssh
Sometimes the ubuntu firewall blocks TCP packets over 22, we configure it allow tcp connect at port 22:
sudo ufw enable
sudo ufw allow 22/tcp
If your client is on the same network as the server we can directly setup the ssh connection by finding the LAN ip of our server, on ubuntu we find out this with hostname -I.
Then from the client side we can initiate the ssh connection with:
ssh username@lan_ip_addr
If all goes well it prompts you for your password and you have successfully sshed into your new server. You can now also make your ssh connection more secure by adding auth keys and can also prevent server from shutting down. I also discuss how you can monitor the health of your server in appendix.
SSH over WAN
If you are on a different network than your LAN, things are slightly different, you will have to additionally configure your network connection and firewall to enable outbound WAN to LAN connections via port forwarding over IPv4. In my case I have a wifi router. Usually we can configure the router settings by logging to the router’s ip address, the details of this can be found on the router itself with the admin user name and password.
Setting up Router
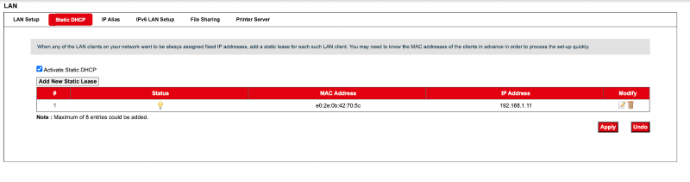
The first thing that we want to do is for my router to give me a static ip address so my ip does not change. We can configure that in LAN or Static DHCP settings. Click on activate static DHCP and then add a new static lease with your MAC and LAN IP address. On ubuntu you can check MAC addr with ip -br link:
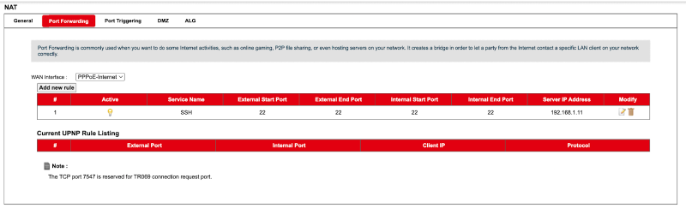
We also have to add a port forwarding rule so that when we try to establish an ssh connection over port 22, when the packets reach the router it gets to our machine in the LAN. Basically Network Address Translation (NAT) is responsible for this it rewrites the IP and port of the packets as they arrive at our router ensuring the replies gets mapped to the correct internal machines. This is how I added my rule:
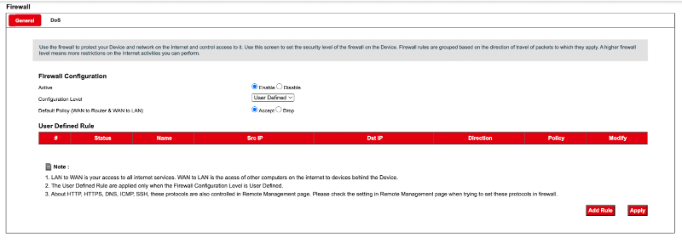
Sometimes the router firewall prevents and drops all packers from WAN to LAN which was the case for me. We can set the configuration level to user defined and accept the WAN to Router and WAN to LAN:
With this done we can now successfully connect to our ssh server from anywhere in the world now :). To connect we can run ssh user@wan_ip. To find out your WAN ip you can run curl -4 ifconfig.co.
The next section discusses how to make you server for secure and robust.
Appendix
Preventing server from shutting down
It’s no good use of a server if it goes down every time I close the lid or if it goes in sleep mode. We want our SSH server to be running even when we close the lid. We can prevent this by ignoring the HandleLid events in logind config file. Set the following lines to ignore in /etc/systemd/logind.conf:
HandleLidSwitch=ignore
HandleSwitchLock=ignore
HandleSwitchLidExternalPower=ignore
We can also set the screen to blank after 1 minute of inactivity with:
setterm -blank 1
And reboot the your server now.
Setting up Auth keys
Setting up your ssh server without any authentication keys and only relying on the user password is very insecure. You can generate your public and private keys with ssh-keygen:
ssh-keygen -t ed25519 -C "your_email@example.com"
Follow the process, you can optionally set a passphrase to make it even more secure. After this you will have 2 files: a public key (~/.ssh/ssh_server_key.pub) and a private key (~/.ssh/ssh_server_key).
We now need to copy the public key to the server and add it to authorized keys. Run this on your client:
scp ~/.ssh/ssh_server_key.pub user@server:/tmp/key.pub
This will copy it to a temporary file /tmp/key.pub. Now append it to authorized keys and give proper perms:
mkdir -p ~/.ssh
chmod 700 ~/.ssh
cat /tmp/key.pub >> ~/.ssh/authorized_keys
chmod 600 ~/.ssh/authorized_keys
rm /tmp/key.pub
Now turn off the password authentication and only allow authentication with public keys. Edit /etc/ssh/sshd_config:
PubkeyAuthentication yes
PasswordAuthentication no
Restart ssh so that the changes takes place into affect:
sudo systemctl restart ssh
Now it’s done! You have to provide the path to your ssh private key while setting up the ssh connection:
ssh -i ~/.ssh/ssh_server_key user@server
To prevent writing identity files every time we login we can append a config for this in the ~/.ssh/config file:
Host my_ssh_server
    HostName server
    User user
    Port 22
    IdentityFile ~/.ssh/ssh_server_key
    IdentitiesOnly yes
And now do ssh with:
ssh my_ssh_server
Monitoring your Server
Setting up the ssh connection is the least of the challenges when hosting a ssh server. Since the server is just my old laptop which will be running 24/7 everyday with the lid closed there are chances of overheating and the performance degrading due to overheating. I have noticed it’s not an issue when I am not logged in. But when I am logged in I need a way to view how the server is performing and what is the temperature of the CPU and GPU. The sensors command provides us with these temperature information. Previously I discussed how we can customize the bash prompt to be more productive. In my current setup I use a similar bash prompt which extracts the temperature information and presents it in the terminal prompt: